Wednesday, October 31, 2012

My sewing/stitching room

Recently, I was inspired by Moda Bake Shop's Show Off Your Stash Link Party to really clean and organize my sewing/stitching room.

Here the photos of my favorite room in our house (except for the carpet).  You can click on any of the photos for a larger view.

First of all, my sewing room is upstairs.  Here is the view looking down.  I love the quilts that I have hanging in the stairwell.  As you can see, my cat Spooky likes my room as well.  The veil in the upper right was from my wedding.


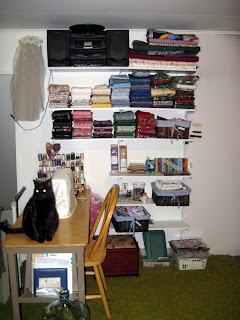
Here is the start of my quilting area which is all on one side of the room.  I got the idea for stacking my fabric like this from Quiltville.  The top shelf has my radio/cd player plus some quilt tops that need finishing.  The fourth shelf down has all my pretty precuts.  Any tools or accessories for my sewing are in the sewing box on the floor.


Here is my cutting and design area.  The table is from Joann's online.  The blank wall to the left is my design wall.  I put a layer of high loft, polyester quilt batting on the wall and then put a piece of wide white flannel on top.  In the background, you can see my ironing board.  The quilt hanging on the wall was made by my grandmother.


The plastic drawers hold my crochet threads, ribbons I've won, orphan quilt blocks and some miscellaneous stuff.  The chest of drawers has my cross stitch fabric; fat quarters; misc. fabrics.  On top you will see my wedding bouquet.  The two leather boxes hold my collection of frame samples for when I choose a frame for my completed cross stitch projects.  I order my frames from Picture Frames.com.


Next we come to my cross stitch area.  The bags are for holding small projects that I can work on away from home.  My WIPs that are awaiting their turn are hanging on the wall.  The glider rocker (and ottoman) and the Ott Lite were gifts from my DH.  Actually, the floor stand was too!  Yes, I am spoiled!  The project in progress is Rapunzel - Dawe from Heaven and Earth Designs.


In this odd alcove, I have a filing cabinet which holds my cross stitch patterns (top drawer); crochet books and patterns (next drawer); quilting books and patterns (lower drawer); and craft glues and misc. kits (bottom drawer).  The armoire has all of my Mill Hill beads; cross stitch kits; yarns; misc. tools; misc. craft supplies.  On top of the old sewing machine is my DVD player and to the right is another gift from DH - a LCD tv!  (You didn't think I was kidding when I said I was spoiled, did you?)


And in this corner, we have my books (mostly non-craft); my cross stitch magazines; my DMC floss collection and my Kreinik metallics (bottom right); and the shoe box tubs have various-sized cuts of material for quilting.


And here we are back at the top of the stairs.  The hope chest holds my quilt batting and gives Spooky a perch for looking out the window to our backyard and the alley.


Here is my attempt at a 360° view of my room.  It's a little wonky in spots:


Happy Stitching!

Stacy

Monday, October 29, 2012

Ooh...

my order of photo paper arrived today!  Now I can print copies of my Polaroid photos.  I didn't want to put the actual Polaroids in my scrapbooks so I'm going to make new prints and scrapbook them.

I have been making progress getting photos out of the first magnetic album.  I'd say that about half of the photos are out of it and I have 20 pages completely done and into the new album.

Now I'm off to do a bit of housework then I'll dive back into the scrapbooking!

Happy Stitching (or whatever)!

Stacy

Thursday, October 25, 2012

My Window Quilt

I first heard about window quilts from one of my online groups (StashBuilders).  After doing a Google search, I found a couple of sites that I found particularly helpful:

Energy Boomer: Window Quilts
Design Your Own Insulating Window Quilts

Using both these sites, I decided to make my own window quilt for in my sewing room.  Here's how I did it:

  • Measured the inside of the window frame.  Mine was 26" x 56".
  • Cut muslin for the backing.  I cut it about 32" x 60" so that I'd have plenty and I would trim the excess later.
  • Cut up an old king-size flannel sheet for the batting layer.  Since it was a king-size, there was enough to give me two layers for extra insulation.
  • Chose a pattern for the front which faces into the room.  I'd never done a Disappearing 9 patch before so this seemed like a good time to try it.
  • Once I finished the top, I put the four layers together and did a simple quilt in the ditch on my sewing machine.
  • Trimmed the backing and fillers 1/2" smaller than the front.
  • Folded 1/4" of the front border under then folded it around to the back instead of using bias binding.
  • Made a hanging sleeve approximately 3" narrower than the width of the quilt.
  • Cut two ties 2" x 50" from the same material as my borders.
  • At the top edge of my quilt, I pinned the:  folded edge from my front border; then the hanging sleeve on top of that; then my ties (6" in from each side).
  • Starting at the top, I sewed through the binding, sleeve and ties then continued around the rest of the quilt just sewing down the binding.
  • Blind-stitched the bottom edge of the hanging sleeve.
  • Hung the quilt on a tension rod.
Here's what the front of the quilt looks like (before I put the layers together):


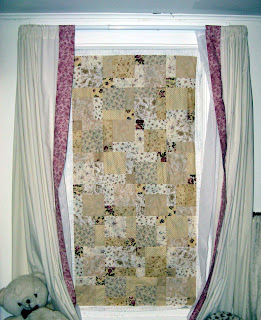
And here is what the window quilt looks like hanging in the window:


Happy Stitching!

Stacy


Wednesday, October 24, 2012

Uh-oh

I think I may actually be getting organized in my old age (ok, I'm not really old, I'm only 43)!

My sewing room is really starting to look tidy.  I still have a couple of small areas that need straightening up but on the whole, it's looking good.

In my office area, the computer desk is mostly clean.  The most notable spot is the printer - nothing's stacked on top of it!  ;-)

Also in my office, the other desk is now set up for my scrapbooking.  My scissors are all now on a thread rack which is hanging on the wall.  My scanner, paper cutter, stapler and hole punch are all accessible.  There is enough empty space to layout a 12in x 12in page.

I'm the secretary for my Tuesday night bowling league.  My paperwork for this week has all been entered into the computer and everything I need for next week has been printed and is in my binder ready to go.

This is not like me - Procrastination has always been my friend.  The scary thing is that I find I like the organized me - hope I can hang on to her!

Happy Stitching (and organizing)!

Stacy

Tuesday, October 23, 2012

I've made a start...

on getting my photos out of those nasty magnetic page albums and into acid-free scrapbooks.

I'm not one of those scrapbookers that has to have every page "just so" with all of the fancy flourishes.  I do like to have my pages look nice but relatively uncluttered.  I print the photo descriptions on card stock usually using the same font throughout the album.  To give a little bit of interest, I do trim the card stock using the fun and funky scissors available.  Currently, I have 11 different scissors for this part of the job.

Hopefully, I can get a few pages done each day.  I have two of the magnetic page albums and they are my first priority.  The other albums I have (that aren't acid-free) have the slide-in style pages so they're not as bad for the photos or as difficult to work with.

I've made up six (12in x 12in) pages today - I just need to print and mount the description for each photo.

Wish me luck!

Stacy

Update:  Those six pages are completely done and in their new album!

Friday, October 19, 2012

Online Needlework Show - my choices

Here are a few of the items that I liked from The Needlework Show...
(please note, some of the images might not show up once the show is over)

From Blackberry Lane Designs:


From Blu Cobalto:


From Creative Poppy:


From Keslyn's:


From The Needle's Notion:


From Threaded Needle Designs:


Each of the designers that I have shown here also had other items I found interesting but these were the ones that really jumped out at me.

Happy Stitching!

Stacy

Online Needlework Show

The Needlework Show, is going on right now!  The show dates are October 18-23.

What could be better than attending a needlework show in your pajamas (if you choose)?!

This year's show has 92 vendors.  You can linger as long as you like in a "booth" and no aching feet from walking!  The link above will take you directly to the booth links.

I'm off now to browse.  I'll be posting a few of the items that catch my eye.

Happy Stitching!

Stacy

Tuesday, October 16, 2012

Least Favorite Thread...

Stitching the Night Away Stitching Bloggers Blog Hop

The question for Blog Hop #10 is:

What’s your absolute least-favorite thread to work with?

I can guess what the most common answer will be:  blending filament (BF).  I think I'm in the minority 'cause I don't mind working with BF.

This question is really tough for me.  To paraphrase Will Rogers, I never met a thread I didn't like.  The best that I can come up with is Kreinik #16 braid.  That is one fat thread and it's difficult to work with.  The only way I've ever used it is as a couched thread.  The couching is okay but in order to hide the ends, you do have to bring it up from the back at the beginning and then take it through to the back at the end.  It's so thick and rough that just those two passes through the fabric are really hard to do.

Happy Stitching (with whatever thread you need)!

Stacy


Visit all the blogs in this round of the Stitching the Night Away Stitching Blogger Blog Hop:
Find the instructions on how to participate in this round by clicking here.

Saturday, October 6, 2012

Scrap Afghan

Here is a photo of a scrap afghan I designed and crocheted.  It's pretty simple to do and a great way to use up yarn, particularly if you have a good bit of a color but not enough to make anything by itself.

I've listed directions below but since I was just trying to use up some yarn, I didn't measure anything so nothing is exact!


You will need:
  • Afghan hook - I used a size J (US).
  • Solid color yarn for the primary color (A), several ounces  (I used ecru in mine.)
  • Various yarn colors (B), probably a couple ounces of each
Directions:
  • Using color A, make a chain as wide as you want your afghan to be.
  • Work 5 rows of afghan stitch.  All rows are worked in this stitch.
  • Rows 6-10:  Continuing in afghan stitch, bring up 5 loops of color A; switch to color B and bring up loops in color B until you are within 5 stitches of the end of the row.  Switch back to color A for the last 5 loops.  I found it easiest to have a separate skein or ball of color A for these last five loops.
  • Working back across Row, do 5 stitches in color A; switch to color B; do last 5 stitches in A.
  • Rows 11-15:  work in color A.
  • Repeat rows 6-15 until afghan measures as large as you'd like; do not finish off.
  • For border:  in top of third stitch from hook work 8 treble crochet (fan made).  Skip 3 stitches; work 8 treble crochet in next stitch.  Continue across to the third stitch from the end, work 8 treble crochet.  Do not work in the corner - skip to the third stitch past the corner and continue around.  Finish off.
Because you are choosing the length of your initial chain, you may need to adjust by a stitch or two across each side as you work the border.

If you make an afghan based on these directions, I would love to see your work!

Happy Stitching!

Stacy

I never realized...

how easy it is to spend $80 (US) on stitching supplies!  I received my order from 123stitch yesterday.

I got the two thread/accessory packs for the Heirloom Nativity Sampler by The Victoria Sampler.  I already had the leaflet but had to save up some money for the threads.


I also bought an ornament kit, Mistletoe from Dimensions.


I may attempt to start and finish the ornament before this Christmas but I'm not going to hold my breath!  ;-)

Happy Stitching!

Stacy

Monday, October 1, 2012

Blog Hop #9 - Stitching Tools

Stitching the Night Away Stitching Bloggers Blog Hop

The blog hop question for this round is:

What are your must-have stitching tools and aides? Other than your trusty scissors, of course. Is there a problem you have had when stitching that you created your own solution for, or have you purchased a tool that helped?

Wow!  Another tough question to narrow down so I don't think I will limit myself!  ;-)

Absolute must-haves are my scroll frames and floor stand from Artisan Design!  I have the original Gazelle floor stand with the optional chart holder.  I have enough scroll frame rods and sidebars to make 7 (yes, 7!) complete frames.  All of my frames currently have a project on them.

Other gadgets that I've found to be extremely helpful include:
Other items in my sewing/craft room that have me so spoiled:
  • DVD player
  • LCD tv
  • glider rocker and ottoman
Happy Stitching!

Stacy

Visit all the blogs in this round of the Stitching the Night Away Stitching Blogger Blog Hop:
Find the instructions on how to participate in this round by clicking here.