Energy Boomer: Window Quilts
Design Your Own Insulating Window Quilts
Using both these sites, I decided to make my own window quilt for in my sewing room. Here's how I did it:
- Measured the inside of the window frame. Mine was 26" x 56".
- Cut muslin for the backing. I cut it about 32" x 60" so that I'd have plenty and I would trim the excess later.
- Cut up an old king-size flannel sheet for the batting layer. Since it was a king-size, there was enough to give me two layers for extra insulation.
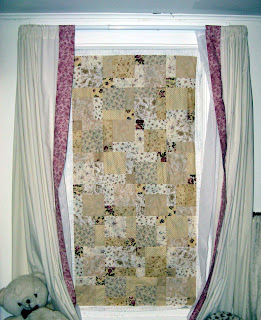
- Chose a pattern for the front which faces into the room. I'd never done a Disappearing 9 patch before so this seemed like a good time to try it.
- Once I finished the top, I put the four layers together and did a simple quilt in the ditch on my sewing machine.
- Trimmed the backing and fillers 1/2" smaller than the front.
- Folded 1/4" of the front border under then folded it around to the back instead of using bias binding.
- Made a hanging sleeve approximately 3" narrower than the width of the quilt.
- Cut two ties 2" x 50" from the same material as my borders.
- At the top edge of my quilt, I pinned the: folded edge from my front border; then the hanging sleeve on top of that; then my ties (6" in from each side).
- Starting at the top, I sewed through the binding, sleeve and ties then continued around the rest of the quilt just sewing down the binding.
- Blind-stitched the bottom edge of the hanging sleeve.
- Hung the quilt on a tension rod.
And here is what the window quilt looks like hanging in the window:
Happy Stitching!
Stacy


1 comment:
Beautiful job! I hope this project helps keep you a little warmer this winter while also looking great :)
Post a Comment