Showing posts with label finishing. Show all posts

Monday, July 31, 2017

Finish It Up Challenge

Yes, yes, I know.  I have been neglecting this so far this year.  I couldn't even remember all that I had put on the list.  I did remember one thing though:  Finish my Through the Storm cross stitch as a free-standing block.

Guess what?  It's done!


Here's my list for this year:
  • Put all my loose floss on bobbins finished January 27th with new purchases done February 3rd
  • Stitch a design for the candlescreen that I have
  • Assemble my Happy Blocks quilt top
  • Assemble my Crumbs quilt top
  • Finish hand-quilting the Bullseye Quilt
  • Finish the Log Cabin Star wallhanging
  • Hand-quilt at least 10 blocks on my Christmas Strings quilt
  • Finish my Through the Storm cross stitch as a free-standing block  finished 30 July
  • Finish my green Temari ball
  • Finish 1 of my Santa kits (not cross stitch)
  • Make bookcases for my sewing room
  • Decorate wooden "S" for my sewing room


I have started on the 3rd one from the top:  Assemble my Happy Block quilt top.  So far, I have most of the blocks assembled.  I need to figure out what I'm going to do for sashing and borders.

Happy Stitching!

Stacy

Monday, July 27, 2015

Framing Needlework Tutorial, part one - Picking the Frame

I've had requests for information on how I do my own framing.  Hopefully, I will have detailed enough information in this tutorial to help you frame something yourself.

I am not an expert!  I have read tip and tricks from many reliable sources but am completely self-taught on framing needlework.  I have had multiple projects that I've framed win first place and better ribbons at our local fair.  Proper framing is one of the criteria.

Typically, once I've finished a project the first step is to choose my frame and/or mat(s).  I do this before I wash my piece so that I am handling it less after it is clean.

I get all my frames, mats, foamcore, acrylic (instead of glass) and hanging hardware from PictureFrames.com.  You can get frame and mat samples from them for a small fee if you want a corner sample, or for free if you're fine with just a small side section.  I've always gotten any samples I need added in with an existing order.  I would assume that you would have to pay for the shipping if you are just getting samples.

No, I'm not affiliated with PictureFrames.com.  I'm just a very happy customer.

Measuring your piece

First, I needed to measure the actual stitched area of my piece.  Unless it is something with straight sides, I will have to determine the widest and/or tallest points of my stitching.  Unfortunately, there might be some stitches on one edge that don't line up directly with the stitches on the other edge, so I needed to make sure I had accounted for them all.


On this Santa, the sunflowers on the left and his sleeve on the right are the widest points of the stitching.  Using a quilter's ruler is great because of all the grid lines!  As you can see, the stitching is 3¼" wide.  Always round up to the next 1/8" if it's not an exact fraction of an inch.  For instance, something 3.4" should be rounded up to 3½".

Now this bit is important:  add at least ¼" to this dimension!  Traditional framing usually subtracts about a ¼" from the dimensions of what's being framed (prints) to hold it in place.  Needlework doesn't need to be held in place by the frame or mats because of the extra fabric around the edges that goes around your backing material - usually foamcore.  Personally, I usually add ½" - ¾' to give myself a bit of a fabric border between the stitching and the mat(s).

I didn't take a photo measuring the height of this Santa but overall it is 9 5/8" tall and 3¼' wide. You'll see my "signature" in a few of the following photos.  I did not include that in my measurements because I wanted it hidden behind the mats.  Why did I even sign it then?  So that long after I'm gone, if the frame is ever damaged or someone rescues it from obscurity, it will still be a "signed" piece.  There wasn't really a way to hide it within the design where it would still be visible, so I went this route.

Because this is so narrow, I had to round up to at least 4" for the width because that was the smallest size allowed by the frame company.  I ended up using the dimensions 4 1/8" x 10 3/8" as the size of the "image" I was framing.  Whatever amount you end up adding to the width, make sure you add the same amount to the height or you'll end up with a "unique" framing package!  If you want unique on purpose, go for it!

Choosing mat(s)

Whether you choose to use mats is a matter of personal preference.  Personally, I prefer.  At the very least, a single mat will keep your needlework and the acrylic from touching which is an absolute must!

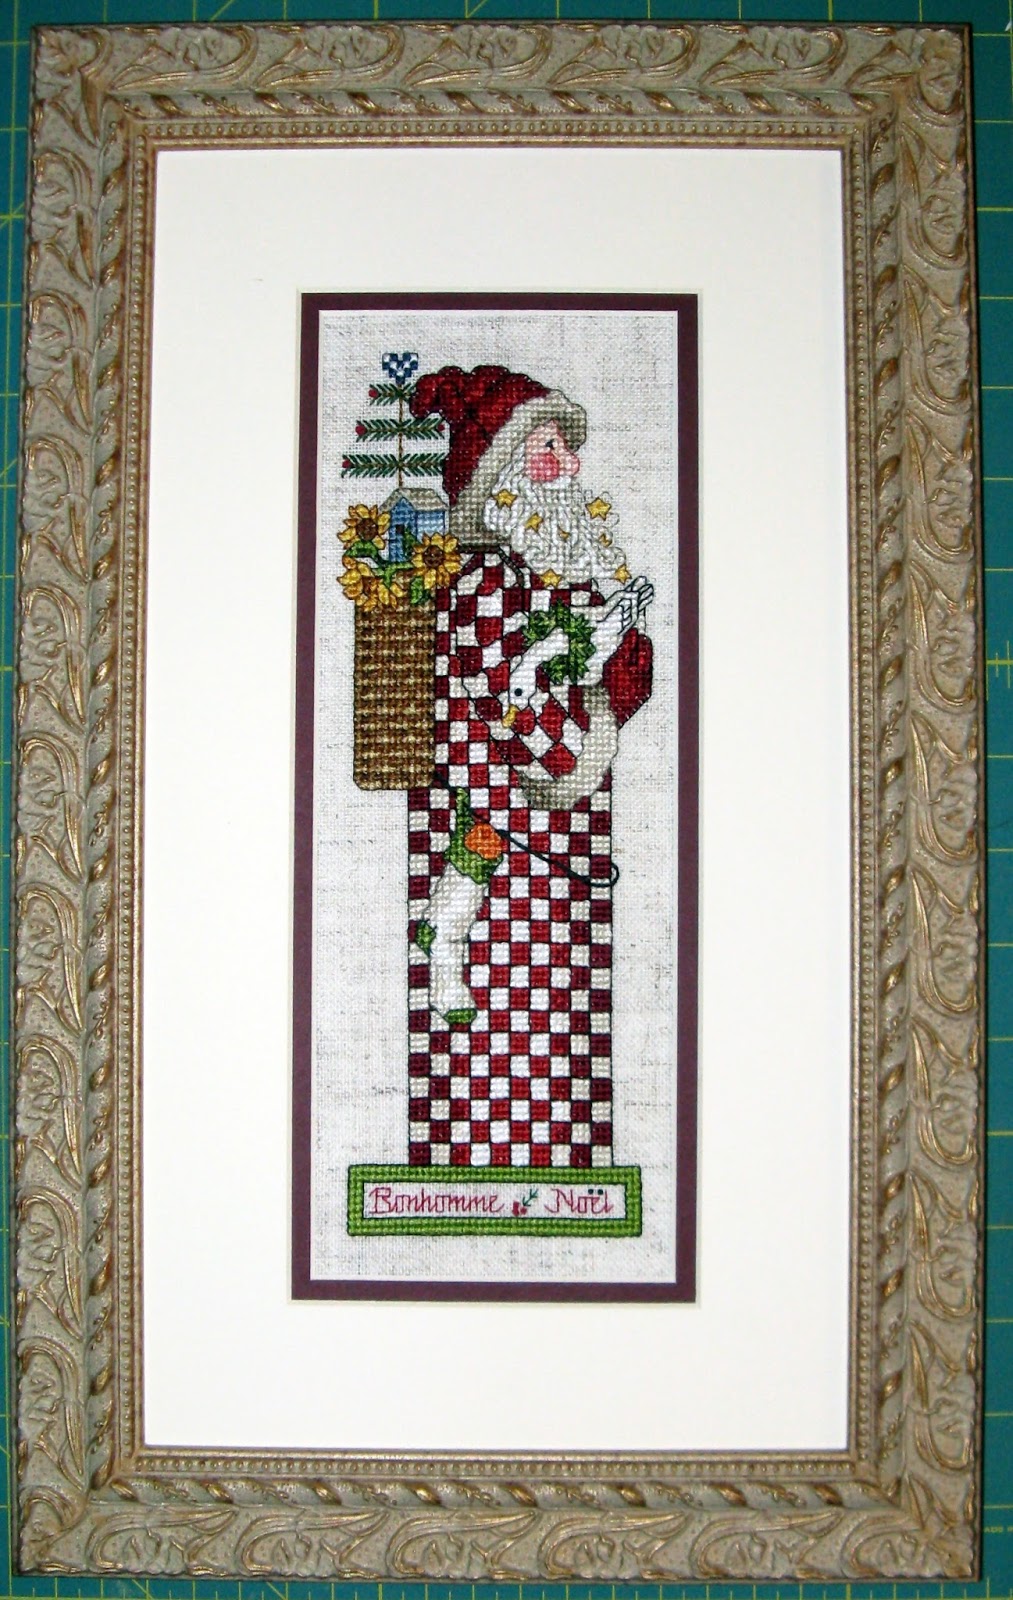
The best rule of thumb I've heard for choosing a single mat's color is this:  choose the 3rd most predominant color in your artwork.  For a second, or even third mat, I don't know of a rule of thumb.  I choose another color in the artwork.  I don't have a formula for this, I just do a trial and error method.  This is where my mat samples come in.  The cover photo for this Santa had a white-ish and a dark red mat.  Since I liked that combo, that's where I started.  I grabbed a couple different red mats and put them on my piece to see which looked best.


In this instance, I preferred the darker one.  Now to see it with the white-ish mat:


The standard amount for offsetting mats is ¼" so I tried to stack them about that much apart for the visual inspection.  The two colors shown here are Maroon and Antique White.


Choosing a Frame

This is a bit rustic looking so I wanted a frame that was a tad rustic looking too.  Unfortunately, I didn't take any photos with the frame sample(s).  Basically, I would just leave the mats where they were in the previous photo and put the frame samples against the outside edge of my mats until I found the one that screamed, "Me!".  In this case, Wood Gold Cream (WX354) screamed the loudest.

If you have a dark wall, frames with a metallic finish are going to stand out well against your wall.  Try to avoid frames that match your wall because they will blend in too much and your entire piece won't "pop" like it deserves to.

If you are not using any mats, you will need spacers to keep a distance between your needlework and your acrylic/glass.

If you buy an "off the shelf" frame you are going to want to make sure that the area where the cross stitch goes is deep enough to accommodate your glass, mats, and fabric on foamcore.  Most stock frames are made for flat items like prints and photographs.  You would be checking the area in red:


Finishing Kits

Needlework should be mounted on foamcore.  Acid-free is, of course, the best option.

Acrylic or glass?  The main purpose of either is to protect your needlework from the "elements":  dust, pet hair, etc.  I go with acrylic mainly because it is what PictureFrames.com offers.  There are advantages:  it's lighter, less expensive, and more shatter resistant.  Yes, you can get acrylic that protects from UV.  Yes, you can get non-glare acrylic too.  Non-glare and UV Protective are not the same thing.  Non-glare is only what it says.  If you are using more than one mat, non-glare will cause your needlework to look blurry because of its distance from the stitching.

Hanging hardware.  After having used both sawtooth and wire options, I give wire hangers two thumbs up...or a high five, fist bump, whatever.  Wire is stronger and much more adjustable.  It also comes standard with most framing packages or at least it should.  PictureFrames.com automatically includes it with any frame purchase.

Here's a photo of this Santa all framed:


Part two of this tutorial series will cover washing your project.

Happy Stitching!

Stacy

Wednesday, December 17, 2014

Latch Hook finish

Whew!  I've done latch hook in the past but I'll admit, I've never finished one before!

This is going to be one of my DH's Christmas presents.  I'm glad I got it completely done with time to spare.  Too many times, I've been up well past midnight on Christmas Eve trying to get a gift done.

I found a couple of finishing tutorials online that did help but I thought I'd share how I made my latch hook project into a wall-hanging to hopefully help someone else.  Hopefully, my directions are clear enough that even someone who wouldn't normally even sew on a button can do this.

Here's the completed project from the back.


First, I trimmed the edges.  I chose to have two full rows of canvas around every side.


Then I notched the corners to reduce the bulk and make it easier to fold the edges over.  I actually had to trim one more horizontal canvas from the top edge of this notch in order to fold it over properly.


I forgot to take a photo at the corner where I started.  I was using a 4-ply yarn to stitch the edges down.  When I knotted it to start, I separated the end into two 2-ply sections.  I passed one 2-ply bit through the canvas and then knotted the two sections together.  You can kind of see that in this photo where I was adding another length of yarn.

I lined up my horizontal canvas edge with the second row up and stitched the canvas down.


When I added a new length of yarn, I tucked the ends of the new piece into the canvas fold so they wouldn't show and would be more secure.


Here's the back once all four edges were folded over and sewn down:


Since I wanted this to be a wall-hanging, I had to have something to hang it from.  Here's where the quilter in me came out.  I measured the canvas from edge to edge.  It was about 19" wide. I took a piece of fairly heavy cotton fabric and cut a piece 20" x 5½".  With it right side down, I folded each short end over 1" and ironed them flat.  This gave me a width of 18" for the sleeve.


I took the material to my sewing machine and did a plain straight stitch near the raw edge of each end.

Back to the ironing board, literally.  I folded the fabric in half, right sides together and ironed it flat.  I went back to the sewing machine and ran another straight stitch down the long side near the raw edge.  This seam is ¼" or a bit less.

Back to the ironing board.  I shifted my "tube" of material so that the seam is in the middle and ironed the seam open.  I also made a point of ironing the top and bottom edges flat.


Next, I turned my tube right side out.  The seam is on the back side.


Using black hand-quilting thread, I started attaching the hanging sleeve to the canvas.  This is one long strand of thread.  One end is put through the eye, then both ends brought together and knotted.  The knot is then held as far away from the needle as possible which puts the middle of your thread at the eye of the needle.   I put my needle into the tube about ¼" and came out through the top edge.  This hides your knot inside the sleeve.  I then took my needle behind the first horizontal canvas thread below the folded edge.


Then the needle goes back into the folded edge of the sleeve and then to the left just far enough to come out again to the left of the next vertical canvas thread (one canvas hole).  Basically, you are doing horizontal stitches that are hidden inside the hanging sleeve.  If you are left-handed, you are probably going to want to start at the left end of your sleeve and sew to the right.

Continue stitching around the horizontal canvas threads and through the hanging sleeve until you get to the other end.  Knot your thread off.  I knotted mine around one of the canvas threads.

Rotate the canvas 180° and sew the bottom edge of the hanging sleeve the same way you did the top.  Here's the sleeve completely attached.  You can see that it is just inside the folded over canvas at the top and at the sides.  This gives it enough room to be stable yet it's far enough away from the edges that it won't be seen.


Here's the finished latch hook hanging from a cafe curtain rod.  Normally, I have a quilt hanging there but I took it down temporarily for the "photo shoot".


The curtain rod is about 1½" away from the wall which doesn't work too well for latch hook.  I purchased a 7/8" dowel for my husband to use.  He doesn't like me using his tools, so he'll have to cut it down.  I didn't know what kind of hardware to get to attach the dowel flush or almost flush to the wall, so DH is on his own there.  ;-)

Will I ever do another latch hook?  Probably not.  I'd been considering doing one as a rug for my office but the design would have to be something I couldn't live without before I'd do one again.  I will say that this one was better than any of the ones I'd attempted in the past.  Not only was the design printed on the canvas, it came with a chart, like you see in cross stitch.  I didn't even pay attention to the canvas, I went strictly by the chart.  Oh, I also got this on sale for $3.99US so with the sleeve and the dowel, I spent about $7 total.  That's not bad!

Happy Stitching!

Stacy