Wednesday, December 2, 2020

2020 Mystery Quilt!

 Hi Everyone!

My new project is the mystery quilt from Bonnie Hunter.  It's not too late to join in!  I just finished the first clue!  Since I didn't finish last year's quilt until August of this year, I'm doing much better on this one.

Here are my first "sets":


I didn't really have any grays or golds in my stash so I did have to buy some for this.  Bummer, fabric shopping.  ;-)

Happy Stitching!

Stacy

#grassycreekquilt #quiltvillemystery @quiltville_bonnie

Monday, November 16, 2020

Another Finish: Victorian Santa

 Hello Everyone!

As I mentioned in my previous post, my next project was going to be a Santa.  Well, I worked on him.  Here he is "built" and finally clothed a bit:


He's fairly large at 22" (55.88cm).  The kit came with everything except the material for the gown and coat.  I chose silver and purple, partially because the accent pieces would go with those colors and I didn't have a Santa dressed in purple in my collection.

Here is the completed Santa:


Behind him, you can see a few of the other Santas in my collection.  I've got my Christmas decorations up already.  It's early, even for me, but...2020.  'Nuff said.

Here are a couple of my trees.  The first one is in our living/dining room.


The second tree is in my sewing room/office.  It's decorated in...Santas!


My next project, which I've already started, is a Christmas wall hanging quilt.  Hopefully, I'll have it finished before November 27th when Bonnie Hunter's new mystery quilt starts.

Happy Stitching!


Stacy

Monday, November 2, 2020

Another Finish: Spin City wall quilt

 This post contains affiliate links.  If you use these links to buy something, I may earn a commission.  Ooh, a little more money for craft stuff!

Hello Everyone!

While 2020 has been a bad year in many ways, at least I'm getting projects done!

My most recent start and finish is called Spin City and it is a small wall quilt.  The quilt measures 31" square.

I used (2) 5" charm packs from this fabric line:


This was the first time that I actually used any of my precut collections!  I felt sort of guilty for even opening one up, so I chose one of my least favorite sets.  ;-)

The binding (and backing) are a Moda marble fabric that I already had.  The small inner border was just another fabric from my stash.

The pattern, Spin City, is from this book (Kindle and paperback versions):


Here is my finished quilt:


I really like the finished quilt.  I wasn't too sure when I looked at the individual fabrics as quite a few of them aren't my normal style.  It has a bit more of an Autumn vibe than the quilt I had hanging there.  In a couple of weeks, it will get (temporarily) replaced by a small Santa quilt I have.

Next project is going to be a Santa Claus kit I've had for awhile.  It's an actual standing figure rather than a quilt or cross stitch project.  I'm ashamed to say that I don't even know how many years I've had the kit!  I did have to buy my own fabrics for the coat and gown.

Happy Stitching!

Stacy

Tuesday, October 6, 2020

Another Finish: Sweet Peas

 Hey Everyone!

I have another finish!  This one is Sweet Peas from The Lilac Studio.


This one is OOP (out-of-print) as the designer switched her artistic talents from cross stitch patterns to baby dolls (or baby doll items?  I don't know.)

I'm not going back to my usual rotation, I'm actually starting something new.  I have two train patterns from Elizabeth Spurlock that I purchased online.  After looking, I've discovered that they are no longer available!  Bummer!  If you want to search for them (like on Ebay, Etsy, etc.), they were published by StitchWorld.  The one I'm starting is Night Train II.  I finished the original Night Train back in March 2008 but never framed it as I want the frames to match.  

Here's Night Train:


If I get this new one done, that will give me 5 items to show in my local fair next year (hopefully!).

Happy Stitching!

Stacy

Monday, September 7, 2020

Another Finish: Filing Cabinet Makeover

 Good morning!  (It's 11am here)

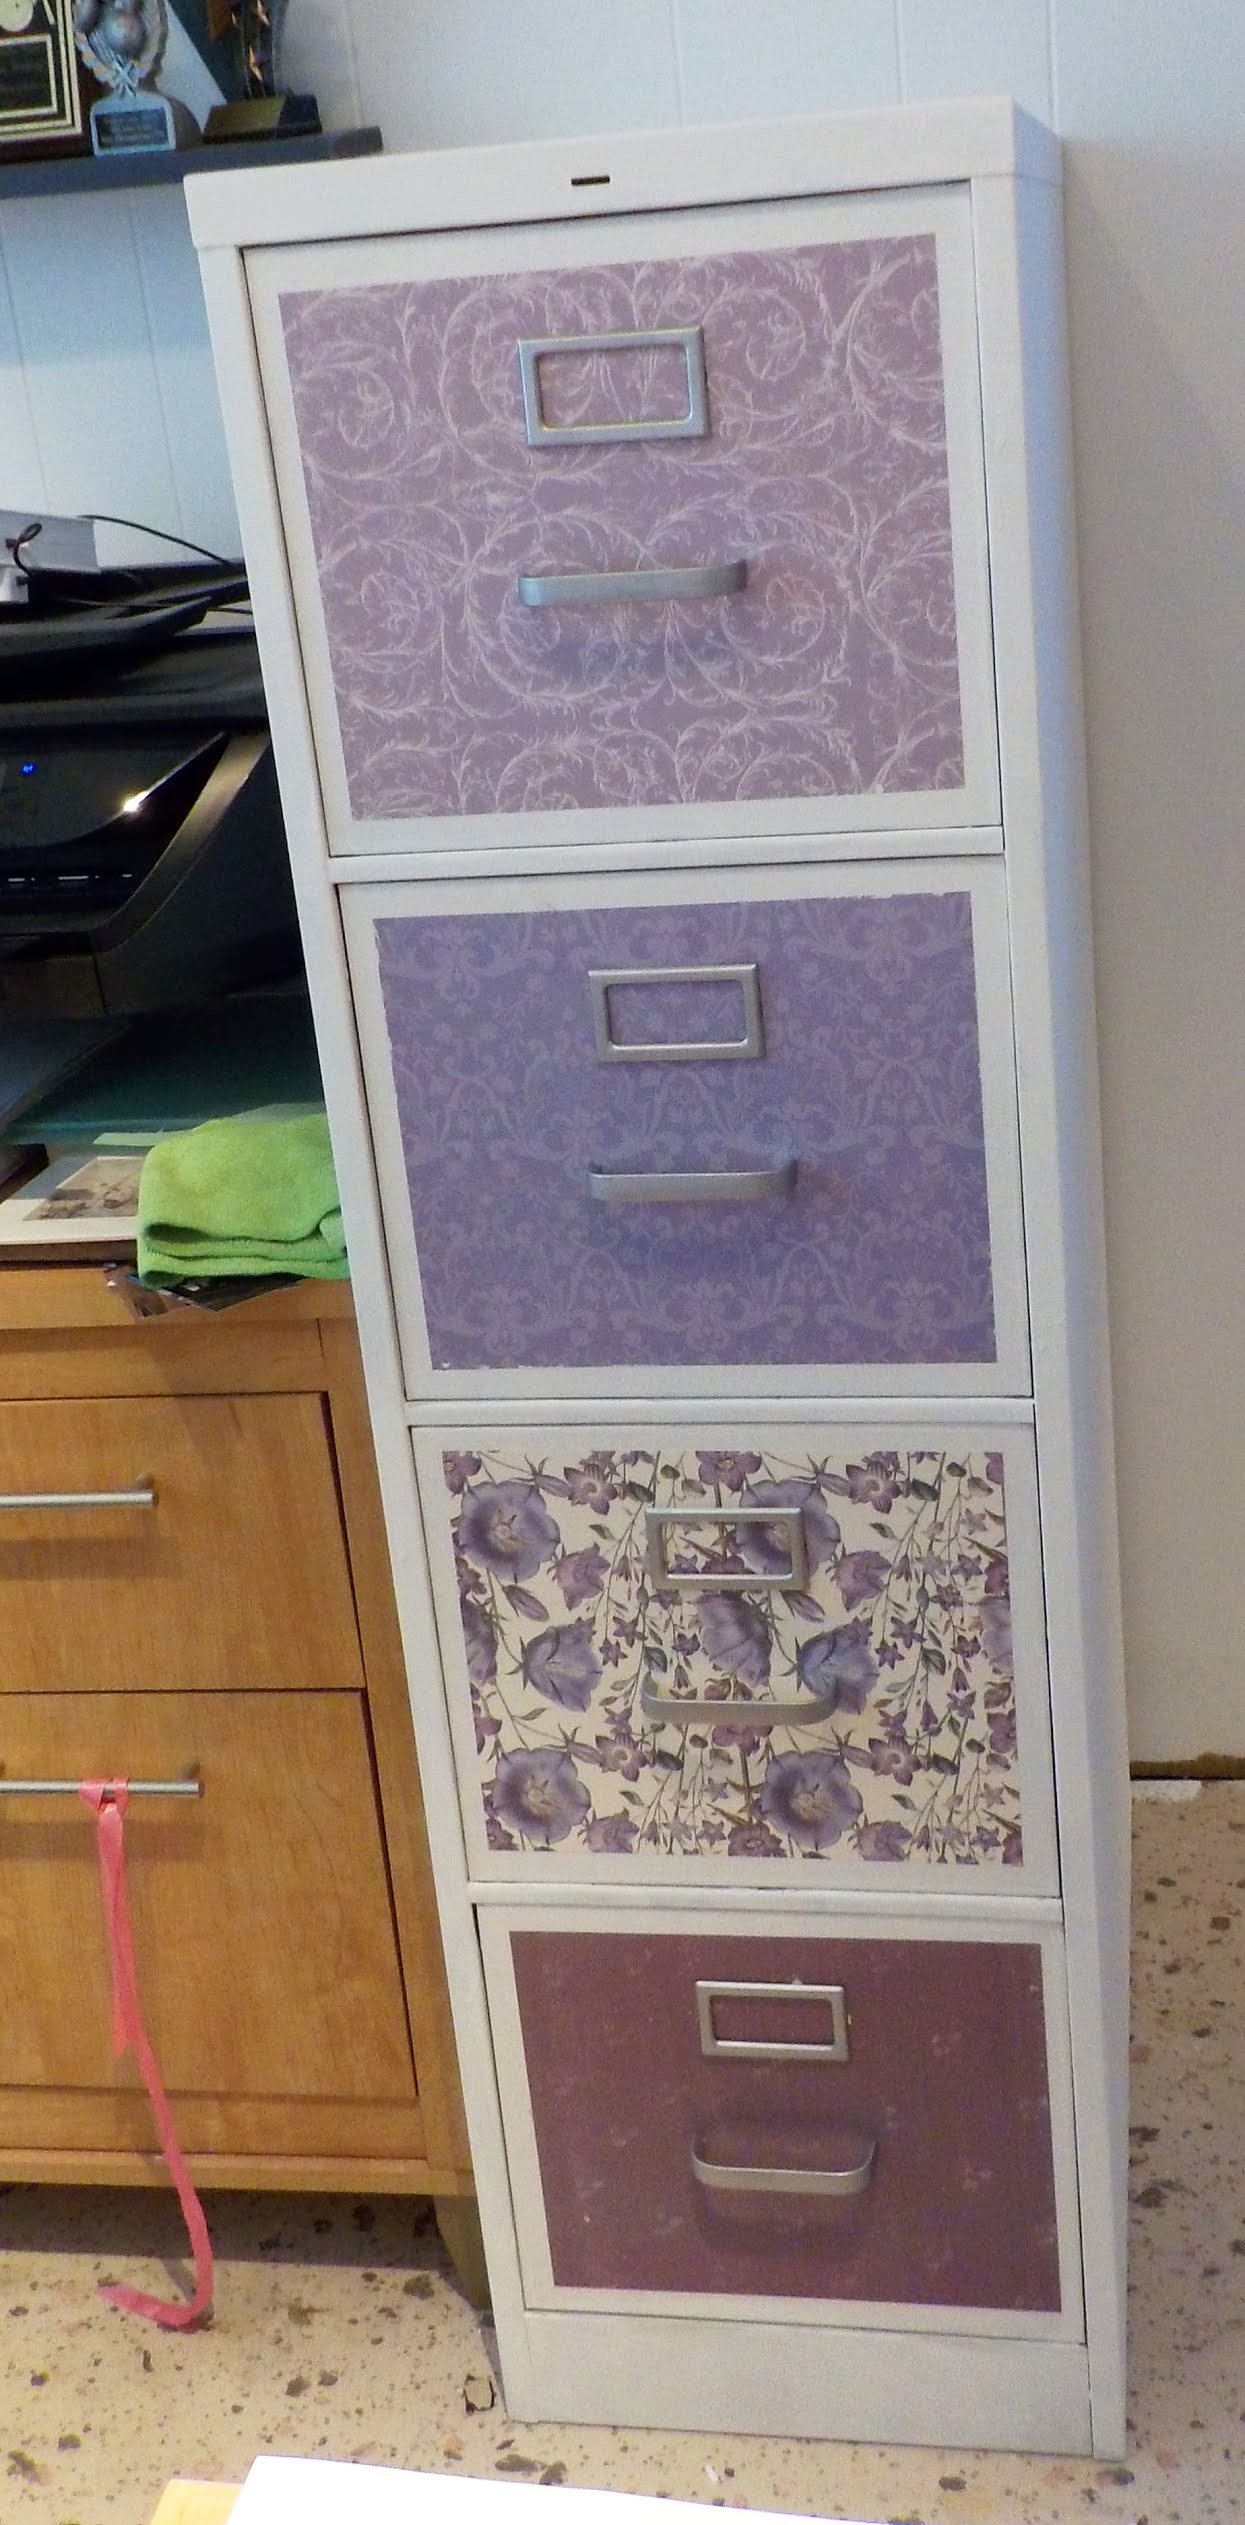
I have another project that I just finished.  This one is for the office area of my room.  I took my ugly filing cabinet and made it pretty!

Here's the beige, boring, beat-up, before:


At this stage, I had already removed the handles and label frames.  If you look closely, you can see the little slider buttons are still there.  I didn't like them and didn't want to bother painting them so I removed them.

No matter how much I Googled it, I couldn't find directions on how to get rid of them so I just stared at them from the inside until I figured it out.  For my cabinet, you had to slide the button to the right to unlatch the drawer so you could open it.  I'll admit, my floors are uneven and slope slightly to the rear of the cabinet, so I don't have to worry about the drawers just coming open.

I didn't think to take photographs, so I'll try to explain it.  The button slid to the right to release a bracket on the inside left of the drawer.  The bracket and button were connected to the drawer with a spring.  Removing the spring was easy and I did that first.  The button was attached to the bracket with a little piece of metal that looked like this \.  I took a pair of vice grips, adjusted their jaws to a little smaller than that piece and clamped them around it.  A simple twist broke the piece and the button came off the front of the drawer.  All I had to do was then jockey the bracket out.  It was an L-shaped piece, so it just needed a little bit of maneuvering.

I used Krylon Chalky White paint to paint the beige away.  It took three coats.  I gave the handles and label frames a fresh coat of silver paint.  I used Rustoleum metallic silver.  I didn't paint the entire drawer fronts but did make sure to paint a border of at least 1" on all of them.

Instead of painting the drawer fronts (all white would have been too boring still), I decoupaged scrapbooking paper on them.  The drawers are 11.375" x 13.5" so regular 12" x 12" scrapbooking paper needed to be trimmed so I'd have an even border around the paper.

I haven't decoupaged anything in decades, so I started with the bottom drawer because it's the hardest to see closely - in case I messed it up.  :-)

I didn't have 4 sheets of identical paper that I liked, so I opted for 4 different, coordinating pieces.  While the whole room is white with dark blue-gray trim, the sewing area has an accent of Tahitian Breeze (sea-glass green).  The office area ended up with a purple accent.  That wasn't really planned, but I like it.  Because of that, I chose purple scrapbook papers.

Well, you've made it this far so here's the finished project:


I do still have to make labels for the drawers.  Maybe I'll do that today.  Basically everything in the cabinet is related to my genealogy research.  Photos, paternal side, maternal side, research/correspondence, etc.

Happy Stitching!

Stacy


Another Finish: Floss Sorted

Any links in this post are not affiliate links.  They are just there to help you if you are interested.

Yo!

I finished my most recent project:  bobbinating, sorting, and storing my DMC floss!  Yes, I know bobbinating is not a word, but I'm using it anyway.  :-)

Here are all my skeins and cardboard bobbins put on plastic bobbins:


Here's how they look in a box.  They are all sorted by number including the duplicates.  To me, it just makes sense to have them all together.


Yes, I have a lot of DMC 800.  No idea why.  I left room for the bobbins that are in use on my various projects.  

I also entered my entire stash into my XFloss app by Coffee Shop Works.  While this app covers DMC, Anchor, Gentle Art Sampler Threads, and Week's Dye Works, I only use it for my DMC.  I have so many other companies' threads that I keep the rest of them inventoried in AirTable.  I use AirTable to inventory my charts as well.

Here's my collection of DMC.  It only took 7 ArtBin Super Satchel Slim cases to hold it.  ;-)


I bought my plastic bobbins (1,000 at a time, twice) and the Slim cases from Joann's.

My next project will probably be to finish the small quilt on my design wall.

Happy Stitching!

Stacy

Friday, August 28, 2020

New Project!

 Hello Everybody!

I've started a new project for an old addiction:  organizing my DMC floss.

I just bought 1,000 plastic bobbins and 2 ArtBin Super Satchel Slims from JoAnn's.  I'm starting to take all my loose skeins and wind them onto bobbins.


I have the finished ones sorted by number "families":  >100, 100's, 200's, etc.

I also have a bunch that are on cardboard bobbins that I need to switch over to plastic:


Since this bin is 12" x 12" x 12" and about half full, I'm going to be here awhile.  Some of them are already on plastic bobbins, so they just need to be sorted.

Once I've got them all on bobbins, I'll put them into the Slim cases.  I have 5 filled already so I figured 2 more should handle these extras as far as overall storage space.  I'll start putting my entire stash into the new boxes in numerical order and should be able to empty each successive box as I go.  I will need to leave a bit of room in each box to hold the floss that's already being used in other projects.  I really believe that when I'm done, my master stash will need all 7 boxes!

Happy Stitching!

Stacy